WEEK 3: Object Behavior Modification and Adding Motives
Author: Grapholina
Within the past two weeks we have made some significant changes to our Cheap Chair,
but there is still room for improvement, and that is what we will be working on
this week. Currently, our beloved chair improves room score and comfort scores,
but the advertisement for hunger has not been touched, and our Sims still do not
like the chair very much. We've worked hard on that chair, so we're going to make
the Sims like it whether they want to or not. I think it's only fair. Before we
begin, make absolutely certain that you have a good copy
of the chair in your safe folder.
ADDING MOTIVES
There is more than one way to add motives, and in this lesson we will cover
at least two of them. In future classes we will become somewhat more creative.
Open your chair in IFF and go to the BHAV section. When adding motives, we can
do so from just about any "action" point, but in the beginning, the
easiest point for adding is to attach the new motives to existing ones. Our comfort
motive is found in Behavior #4113 but we are going to practice on Behavior #4112 first.
Enter into Behavior #4112 now, and let's examine the lines to determine how
and where to add our lines for hunger.
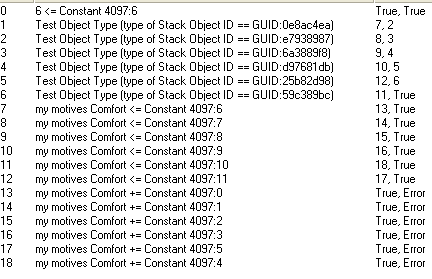
Fig. 1.0
Your "Test Object Type" containing your chair (determined
by the GUID) should be on line 1. Notice that line 1 goes to line 7, and line
7 goes to line 13 whereupon it ends the run for the behavior (T/E). We want to
add the hunger lines unobtrusively and neatly inside that behavior run. We can
manually add the lines, but for now we're going to make do by copying the necessary
lines of comfort and changing them to hunger lines.
WEEK 3: Object Behavior Modification and Adding Motives
ADDING MOTIVES (continued)
Let's duplicate the Comfort < = line, and the Comfort + = line
for our chair. We don't care about the others. Select Line 7, right mouse click
over it and select "Duplicate" from the menu.
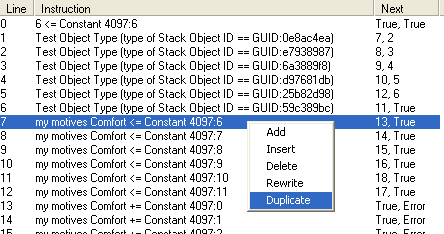
Fig. 1.1
Next, select Line 13 and duplicate that line in the same way you
duplicated Line 7. You should now have two extra lines (19 and 20):
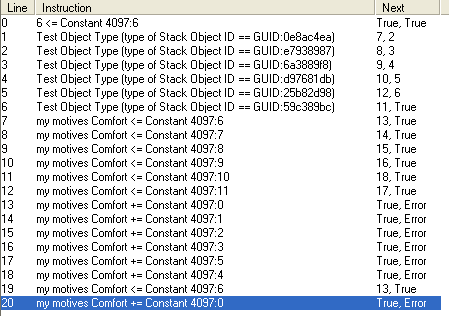
Fig. 1.2
Please don't rewrite, and don't touch anything until I ask you,
unless you want to create a great big mess. Let's push on.
WEEK 3: Object Behavior Modification and Adding Motives
ADDING MOTIVES (continued)
Select Line 19, and look to the right at the Data box. Notice that in Parameter
1, there is a 6 in there for comfort. We want hunger.
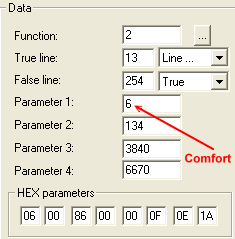
Fig. 1.3
At this point you can pull out your notebook to look up the code
for hunger, but in case you don't have it handy, the code is 7. Code 7 for hunger.
Change the 6 to a 7. Notice how Line 19 now reads for hunger?
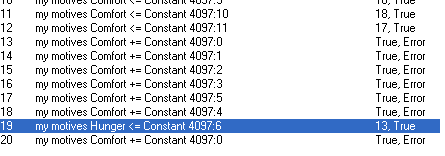
Fig. 1.4
Let's change Line 20 accordingly. Select Line 20, and over in
the Data box, change the number 6 in Parameter 1 to a number 7 for hunger, so
that your lines 19 and 20 now read like this:
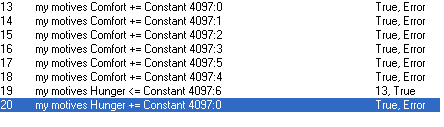
Fig. 1.5
WEEK 3: Object Behavior Modification and Adding Motives
ADDING MOTIVES (continued)
The next step is to tie in the lines so that they flow smoothly.
We can't leave them like this or the game will get confused and possibly cause
a crash. This next step can be somewhat confusing at first, so pay attention,
and if you need to, read and re-read the following instructions until you see
the light.
Place your cursor on Line 7 to select it. It is currently going
to Line 13, but we want to change it so that it jumps to Line 19.

Fig. 1.6
With your Line 7 still selected, move over to the Data box, and
change where it says "13" to 19, like so:
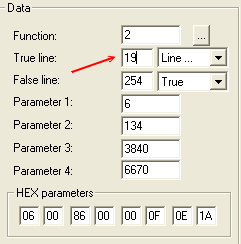
Fig. 1.7
The next line we want to look at is Line 13, because that's where our new Line
19 jumps to. Look at the line:

Fig. 1.8
WEEK 3: Object Behavior Modification and Adding Motives
ADDING MOTIVES (continued)
Notice that the True/False line is saying "True" and "Error".
We need to change this because if we left it as is, the behavior would stop running
at this point and ignore our second Hunger line. The line that tells the chair
how quickly to increase hunger levels.
Move over to the Data box, and change the "True" line to "Line"
from the drop down menu:
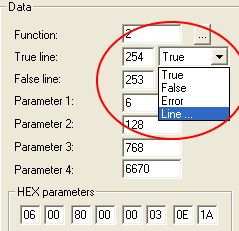
Fig. 1.9
Insert the number "20" in that box:

Fig. 1.10
Line 13 should read like mine depicted below:

Fig. 1.11
WEEK 3: Object Behavior Modification and Adding Motives
ADDING MOTIVES (continued)
and Lines 19 and 20 should look like this:

Fig. 1.12
Take a good look at your IFF screen. Make sure everything looks good.

Fig. 1.13
Rewrite the lines by right-clicking anywhere on the white and selecting "Rewrite"
from the menu. Your lines will not change, but rewriting is a good habit to get
into.
So much for our Behavior #4112 — but there is still #4113 to modify to make our chair actually work. Behavior #4112 was just a practice run, remember? Click
OK to get out of this behavior, and then find and double click #4113 to open it.
You should not have to rewrite, but do it anyway; we're trying to develop a good
habit.
Let's look at our behavior. Study the lines for a moment or two. See if you
have an idea of what to do. If you are up to it, go ahead and try to add the Hunger
motives on your own. Don't worry about getting it wrong; the important thing is
that you at least give it a go. You can check your steps on the following page
where we continue with the lesson.
WEEK 3: Object Behavior Modification and Adding Motives
ADDING MOTIVES (continued)
Alright, then. Here we have Behavior #4113, and the lines pointed to by the
red arrows are the lines we want to duplicate. I know those are the lines because
my chair's GUID line points to those two.

Fig. 1.14
Notice that Line 2 is testing to see if that is our chair. If it is, the script
continues to Line 3, and if it isn't, it jumps to Line 5 to check if that is the
correct chair. Line 3 is our chair, so we ignore the "if it isn't" instruction
and look at Line 3. That line says to move to Line 4 or nothing at all (4, True).
Get in the habit of reading your code. Don't do things 'just because'. The more
you read, the more second nature reading code will become, the better at hacking
you will be.
Note: "Stack Obj" means the
object in question. In this case, it is the object (our Sim) in slot 0 of our chair.
Select Line 3, right-click over it, and then select "Duplicate" from
the menu.
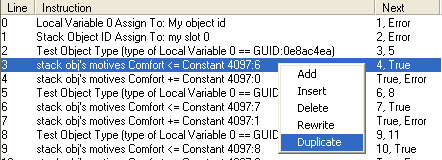
Fig. 1.5
Do the same with Line 4. Select it, and then duplicate it. We now have 21 Lines
of code, right?
WEEK 3: Object Behavior Modification and Adding Motives
ADDING MOTIVES (continued)
Click to select Line 20, and in the Data box, change Parameter 1 to the number
7 for hunger.
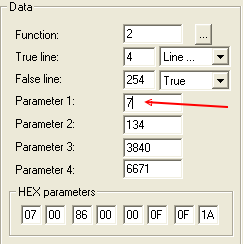
Fig. 1.6
Next, select Line 21, and change the number 6 in parameter 1 to a 7. Your screen
should look like this:
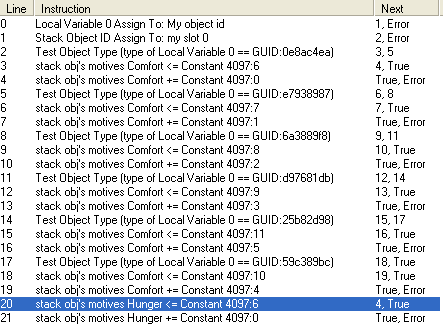
Fig. 1.7
It's time to redirect the lines to tie them neatly into the existing code.
Before we added the hunger motives, our lines followed this route:
Line 2 goes to Line 3
Line 3 goes to Line 4
Line 4 ends the script
WEEK 3: Object Behavior Modification and Adding Motives
ADDING MOTIVES (continued)
We are going to make it read as follows:
Line 2 goes to Line 3
Line 3 goes to Line 20
Line 20 goes to Line 4
Line 4 goes to Line 21
Line 21 ends the script
Everyone get that? Fine. Let's redirect these little lines so that our chair
will work the way we want.
Select LIne 3, and from the Data box to the right, change the number 4 to a
20.
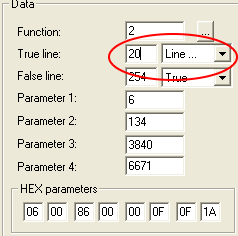
Fig. 1.18
Select Line 20. Notice that the Line already goes to 4, so we can leave this
one alone.

Fig. 1.19
Move up to Line 4 and select it. This was the "ending" line. Look
at the True/Error statement at the end.

Fig. 1.20
With Line 4 still selected, go to the Data box and change True to "Line".
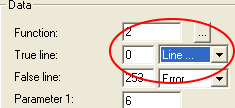
Fig. 1.21
WEEK 3: Object Behavior Modification and Adding Motives
Adding Motives (continued)
Also in the True line, enter the number 21 (the line to be jumped to).
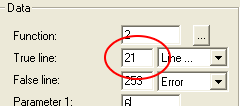
Fig. 1.22
Then, from the False line drop down menu, select "True".
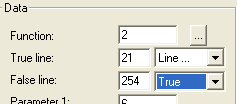
Fig. 1.23
Go down to Line 21, and take a look:

Fig. 1.24
The line already ends correctly with "True/Error", so we do not need
to touch it.
Place your cursor anywhere on the white space, right-click, and select "Rewrite".
Your lines of code are now neatly in place and ready to go. Pretty cool, eh?
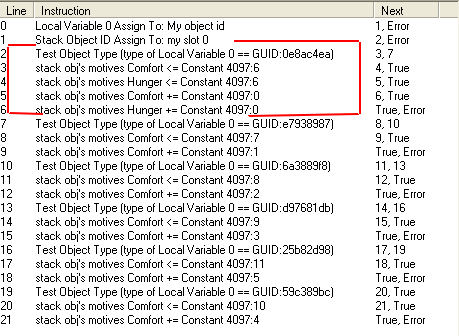
Fig. 1.25
WEEK 3: Object Behavior Modification and Adding Motives
ADDING MOTIVES (continued)
The reason we linked them in this fashion is because our comfort
value is stored in the Constant (4097:6). We want the game to pick up on the value
of comfort and hunger before it goes to pick up how fast it increases over in
Constant 4097:0.
Time To Test
Click OK to get out of this behavior, SAVE your file, and EXIT
IFF. Start your game and test your chair to make sure that hunger levels increase
right along with the comfort levels. Of course, this isn't exactly nifty because,
what's the point of serving dinner if all you have to do is sit in the chair to
satisfy hunger? But who cares. This is, after all, just a lesson. Go test and
come back when you're through. Do not jump ahead in the lesson without first testing
— tempting thought it might be.
How did the test go? If hunger, comfort and room score improved,
then it worked and we can move on. If it did NOT work, please
go back and retrace your steps. Perhaps you missed something along the way.
COMPLETING THE CHAIR
Our chair is looking pretty good except for one little detail. When the Sims
view the chair for the first time, they are still not too pleased. Let's try to
change that a bit more. We will be working with animations and their corresponding
sounds, and we're going to do it the easy way, which means borrowing the animation
and sound we need from a painting.
Note and Reminder: In hacking, there are always
more than one method for accomplishing our work. The method you use is strictly
up to you. In other words, whatever works best is acceptable. I will try to cover
as many methods as possible during the course of our classes.
But, which painting do we use? We can't use just any old painting because not
all paintings carry the "react" behavior that references our animations
and sounds. Our chair has appropriate sounds for Sims who are crazy enough to
think the chair is acceptable, but for the more discerning Sim, we need to try
harder. The procedure we are going to employ is really quite simple — up
to a point. We're going to borrow the animation and sound from a painting that
we know a Sim would appreciate, and that's where the simple stops.
The arrival of the Super Star expansion pack, and once again, with our last
expansion pack, Makin' Magic, dramatically changed the paintings. Things are no
longer where they used to be. The paintings that carried the "react"
behavior are now bare and new paintings have taken on the task. So, we will now
find the paintings we need in three different places, depending on which EP's
you have installed. First we'll find the correct painting for those of you who
do NOT have Super Star or Makin' Magic installed, and afterward,
we'll find the painting for those who DO have Super Star or Makin'
Magic. However, I would like everyone to read through everything because you are
bound to learn something either way. Ready?
WEEK 3: Object Behavior Modification and Adding Motives
Finding The Right Painting
Close out of any program you might have open (it's always good to conserve
resources), and then open up Tmog.
Scroll down until you see "Paintings" and then look to the right.
There are several there, and unfortunately, you can't tell which have the "react"
behavior from Tmog, so unless you know, trial and error is the way to go. Let's
select the first painting in the group: "Painting - Flowers".
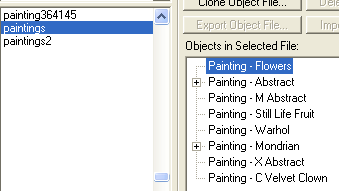
Fig. 1.26
Clone it, and name it anything you like. I'm naming mine "PaintingTest1.iff".
After you clone it, don't forget to go into the edit window and do something like
the image below so you won't confuse this clone with your other files. You won't
be keeping it.
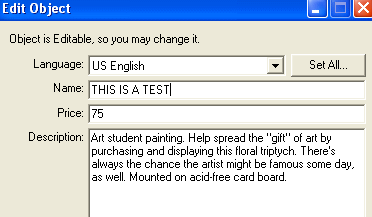
Fig. 1.27
Remember that Tmog will place your cloned painting into the "Transmogrified"
folder, which is located inside your Downloads folder.
Close Tmog, open IFF and open your newly cloned painting.
Select the BHAV section and take a look at the behaviors on the right side.
See anything pertaining to "react" in there?
No? Darn! Let's try another one, shall we? Close IFF, and
open Tmog again. Find your cloned flowers painting and delete it right now, if
you don't you may forget to do so later. I always forget unless I take care of
it right away, because I'm absent-minded that way.
WEEK 3: Object Behavior Modification and Adding Motives
Finding The Right Painting (continued)
Okay, let's pick the right one this time. I'm going to be nice about the whole
thing and tell you which painting it is. Just keep in mind that had you been on
your own, you probably would have to do the above exercise a few times before
getting it right. Or, maybe not; but in any case, the point I'm trying to make
here, is that you must never forget Rule #4:
NEVER give up.
Nobody said this would be a piece of cake, and there is very little, if any,
help out there. As hackers, we have a very small, but tightly knit community,
and although we try to help each other out whenever possible, sometimes the help
is not always swift in coming. Alas, the reason is, none of us has all the answers.
And even those people you might look up to as "Gurus", are only good
up to a certain point, and then they themselves need help. I've worked on objects
that have taken me over 8 full months to complete because I couldn't get help.
But I never gave up. Keep that in mind.
Moving right along, everyone should have Tmog 2.0. Open up Tmog, and depending
on the expansion packs you have installed, you will be looking for a certain painting.
Look below to determine which painting you should be after:
Makin' Magic: If you have Makin' Magic installed, look
for paintingsSpellbound.iff. You'll notice over in the right
hand side that the file contains several paintings. You want to clone the first
one, Painting - Magic - Carnival Painting.
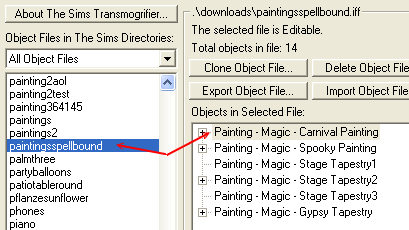
Fig. 1.28
Once you clone your painting, sit tight while we find the correct painting
for the others.
Super Star: If you have Super Star installed, but
NOT Makin' Magic, the painting you want is called Painting - Superstar
- Gold Record. Scroll down in Tmog until you see "paintingssuperstar"
on the left and to the right you'll see all the paintings in that file. You want
to clone the first one, Paintinf - Superstar - Gold Record.
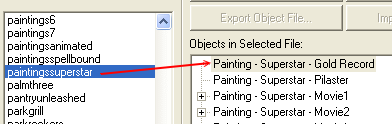
Fig. 1.29
Clone the painting, and then wait for the rest to find their painting.
WEEK 3: Object Behavior Modification and Adding Motives
Finding The Right Painting (continued)
All Others: If you have some, most, or all expansion
packs installed EXCEPT for Super
Star and Makin' Magic, find "Paintings2" in Tmog and then look to the
right. Select "Painting - Retro 1", and clone it.
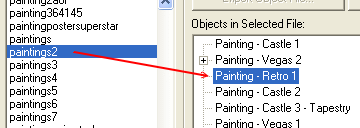
Fig. 1.30
Don't worry, these are the correct paintings. I'm not so cruel as to send you
on another wild goose chase. Or am I?
COMPLETING THE CHAIR
Back to the Lesson: Once your paintings are cloned,
go into the Edit section and type in something to let you know that the clone
is only for testing purposes. Close Tmog, and open IFF.
Bring your painting into IFF, and then select the behaviors section so we can
take a look. Look at the picture below, notice the react
behavior?:
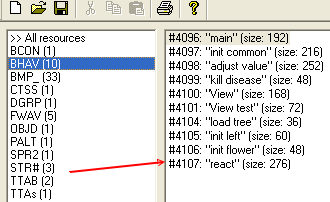
Fig. 1.31
Double click Behavior #4107 "react", and then rewrite the lines.
Take a look at the lines to which the red arrows are pointing. Everyone's screen
should look basically the same in that you will all
see lines of code such as the ones the red arrows are pointing to.
All those are animations and sounds associated with the "react"
behavior triggered by Sims when they view the painting. These animations and sounds
are what Sims use to either approve or disapprove of the object in question. In
this case, the painting. We have the ability to borrow all sounds and animations
and put them to other uses as we see fit.
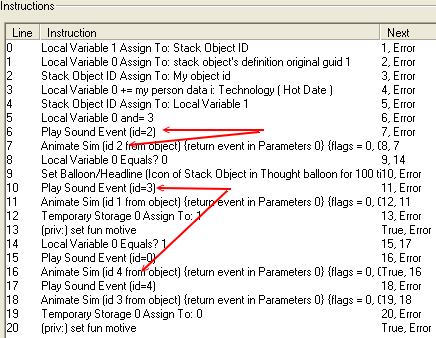
Fig. 1.32
WEEK 3: Object Behavior Modification and Adding Motives
Completing The Chair (continued)
The arrows tell us that this painting can play sounds 0 through 4
and run animations 1 through 4. As to what those animations and
sounds are, we'll find out in a minute.
Note: Depending on your painting, you
may not have animations and sounds 0 through 4; but you will
have lines that reference sounds and animations.
Everyone has their painting ready to go, we've looked at the behavior containing
lots of confusing lines, and now it is time to find out what these animation and
sound id's are, because I don't know about you, but "Animate Sim (id 3 from
object), and Play Sound Event (id=0) doesn't tell me a heck of a lot. Maxis is
more evil than I.
WORKING WITH SOUNDS AND ANIMATIONS
Click OK to get out of the behavior. We are going to explore a new section
of IFF called STR# (string). Select the STR# section, and look to the right.
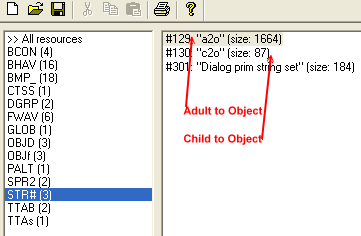
Fig. 1.33
We will completely cover sounds and animations in the Intermediate Level classes,
so we will not be going into great detail at this time and therefore, a brief
explanation will only be covered today. Notice to the right we have #129: "a2o"
and#130: "c2o". Translated, they are Adult to
Object animations and Child to Object animations,
respectively.
Double click on the adult animations, #129: "a2o".
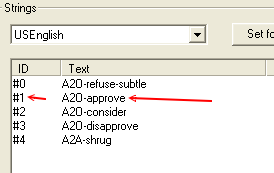
Fig. 1.34
WEEK 3: Object Behavior Modification and Adding Motives
WORKING WITH SOUNDS AND ANIMATIONS (continued)
Remember our Behavior #4107 where we saw all the calls to those ID numbers? Well,
here's where we find out what they are. There are several animations available,
and as you can see for yourself, they are self-explanatory. We want the "approve"
animation. Use your handy dandy notebook, and write this down exactly
as it appears. If you don't, the game will not be able to find it in
the global files. Write down:
A2O-approve
Take care not to write down a zero; that is a capital O (oh) which
stands for Object. Click OK, and let's go take a look at the child animations.
Double click #130: "c2o", and notice that the same animations are
available to children. Not all objects have identical adult/child animations.
That is a consideration you have to take into account when making objects available
to children. You can make a child use adult animations, but they will appear slightly
off in the game because children are shorter.
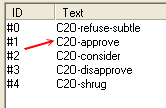
Fig. 1.35
Write down the animation name for the child's "approve",
again, taking care to be precise:
C2O-approve
Click OK, and we'll go explore yet another section, to find appropriate
sounds to compliment our animation.
Select FWAV. Notice to the right we have 6 WAV sounds available,
but they don't say what they are. All we have is a set of open and close parentheses
for a description.
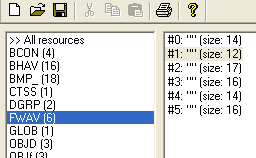
Fig. 1.36
WEEK 3: Object Behavior Modification and Adding Motives
WORKING WITH SOUNDS AND ANIMATIONS (continued)
I want you to see what each one is. If you double click on the
first one, #0, you get a box that looks like this:
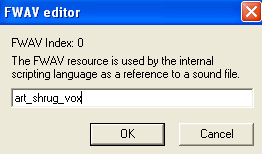
Fig. 1.37
Obviously, this is the sound that goes with the animations Sims
use when they are indifferent to an object. Notice that the animation name contains
the word "art" at the front. There are different shrug animations for
different types of object reactions. This one is associated with art objects.
Click OK to close the editor window.
Double click each of the others to see what they are. On your
own, try to determine which one we are going to use.
If you decided on #3, you are correct. We will be using "art_approve_vox".
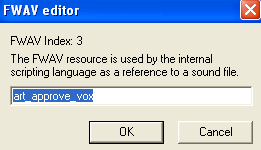
Fig. 1.38
Write the name of the sound file in your notebook:
art_approve_vox
Click OK to close down any open windows, and then close down IFF.
Open up Tmog, and since there is no reason to keep the cloned
painting you created, delete it. When done, close Tmog.
Open IFF once again, and this time, bring in the Cheap Chair.
Click the STR# section and then double click the "a2o" string to open
it.
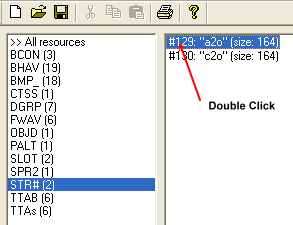
Fig. 1.39
WEEK 3: Object Behavior Modification and Adding Motives
Working With Sounds and Animations (continued)
Your String editor window will open with 9 animations showing
(ID #0 through #8) looking like this:

Fig. 1.40
We cannot delete any of these because the chair needs them to
instruct the Sims on how to approach it for sitting, leaving it, etc. Therefore,
we need to add a line (or an ID) for our particular "approve"
animation. Right click anywhere on the white space, and select "Add"
from the menu.
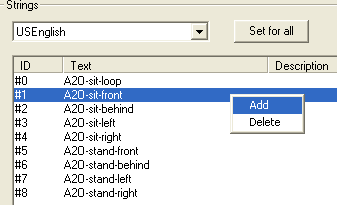
Fig. 1.41
A new ID line will be added to your screen:
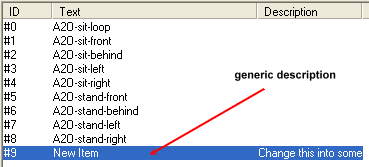
Fig. 1.42
Directly beneath you will find the "Editing" box. Delete
the words found there.

Fig. 1.43
WEEK 3: Object Behavior Modification and Adding Motives
Working With Sounds and Animations (continued)
In their place type in the name of the adult animation
we wrote down in our notebook earlier, and you can delete the words found in the
box immediately beneath.
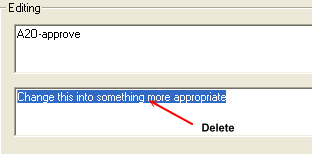
Fig. 1.44
Your window should now look like this:
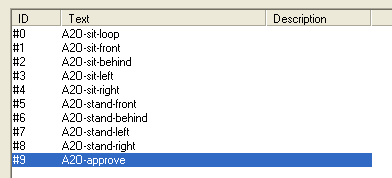
Fig. 1.45
Click OK when done. Next, we need to do the same thing for the
Child to Object animations. Double click the #130 "c2o" string, and
then add the appropriate animation in there, just as you did for the adults.
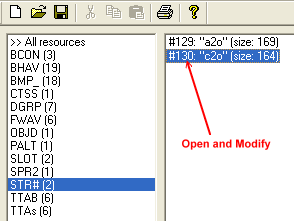
Fig. 1.46
WEEK 3: Object Behavior Modification and Adding Motives
Working With Sounds and Animations (continued)
When done, your child animation screen should look like mine:
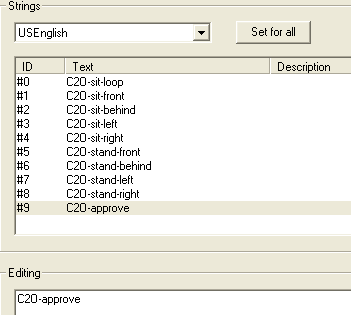
Fig. 1.47
We are done adding new animations to our chair, but before we
leave the area... don't forget to write down the ID number for our new animations.
In your notebook, write:
Animations Approve = id9
ADDING NEW SOUNDS
Click OK to exit the Strings editing window. Find the FWAV section
and select it.
Sounds are added in a slightly different way. Or rather "referenced"
differently. We are not adding actual sounds. We are merely referencing the sound
name so that the game can find it and use it.
Right click anywhere on the white space of the right-hand side
panel and select "Add" from the menu.
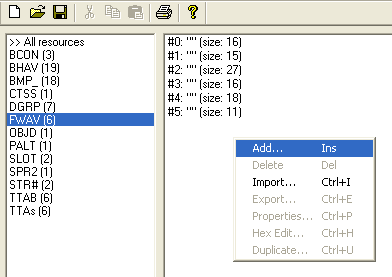
Fig. 1.48
WEEK 3: Object Behavior Modification and Adding Motives
Adding New Sounds (continued)
The Add Item window will pop up. Please fill in the boxes so that
your window looks like mine.
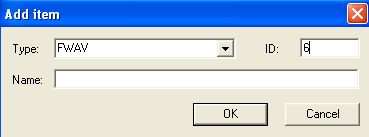
Fig. 1.49
We chose FWAV from the "Type" pull down menu, because
this is a WAVE (sound) file. In the ID box, we inserted the number 6, because
there are already 5 sounds in the chair, and since all those are needed (we shouldn't
override them), we will use the next available number for reference — the
number 6. The Name box we are leaving empty, just like the other sounds already
there. None of them have descriptions. Hence, your FWAV window will now look like
this:

Fig. 1.50
See how each sound file has a (size:16), etc. at the end? Ours
doesn't. Ours is a mere 1. This is because although we have added the slot
that will contain our sound reference, we have not
yet added the actual call to the sound (the sound name).
Note: We cannot import actual sound
files into these slots. Well, actually we can, but since the game does not play
the sounds from here, importing them would be useless. At this point, all the
game asks of you is to tell it which sound to play, and the game will
find it on its own. Hence, the reason we merely enter a sound name and not an
actual sound file.
Let's add our sound reference. Double click our new #6, which is currently
empty. When the FWAV editor opens, insert the name of your approve sound (which
you should have written in your notebook), and then click "OK".
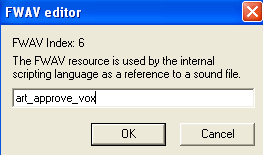
Fig. 1.51
WEEK 3: Object Behavior Modification and Adding Motives
Adding New Sounds (continued)
Note how our #6 line now has a respectable number at the end, signifying that
the slot is no longer empty.
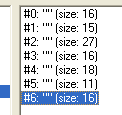
Fig. 1.52
In your notebook, write down: Sound = id6
INCORPORATING OUR NEW SOUND AND
ANIMATION
The final step is to incorporate the sound and animation we added.
To do so, we need to go back to our dear old friend, the "ComeAndSeeMe"
behavior. Select BHAV, double click #4111 to open it, and rewrite the lines if
necessary.

Fig. 1.53
Even though we have significantly modified our chair, we are still,
nevertheless, dealing with a cheap chair; so we need to concentrate on that chair's
references and calls.
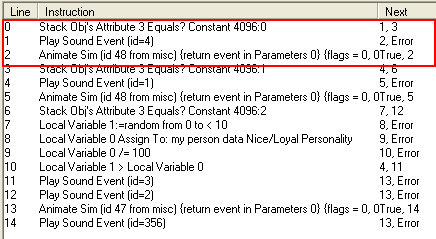
Fig. 1.54
WEEK 3: Object Behavior Modification and Adding Motives
INCORPORATING OUR NEW SOUND AND ANIMATION (continued)
We'll first add the sound. Select Line 1, which is currently calling to play
sound id 4. Over to the right in our wonderful Data box, we're going to get rid
of the number 4 in Parameter 1 and in its place, we'll insert the number of our
new sound ID, which is 6. Change your Data box accordingly.
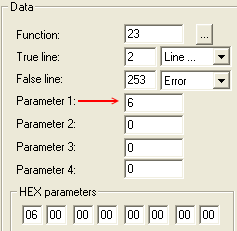
Fig. 1.55
OK, next we'll modify the animation call, but this is slightly complicated.
Look at Line 2:

Fig. 1.56
This line says "Animate Sim (id 48 from misc). The "misc"
part means that the animation will be called from the global
animation file instead of from the object itself. We don't want this. We put the
animation reference directly into our object, so we need to make the line read
accordingly. We want it to say "from object".
With Line 2 selected, go over to the Data box, and change the number in Parameter
1 to a 9 (the number of our animation).
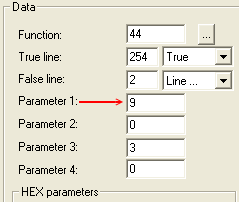
Fig. 1.57
WEEK 3: Object Behavior Modification and Adding Motives
INCORPORATING OUR NEW SOUND AND ANIMATION (continued)
Next, get rid of the 3 in Parameter 3. Change it to a zero (0).
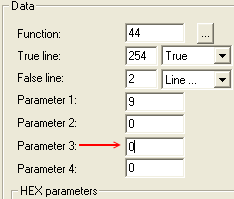
Fig. 1.58
Now look at Line 2:
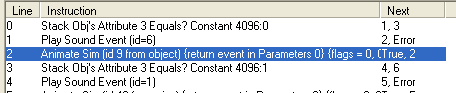
Fig. 1.59
The line is now calling Animation 9 from our object, just
as we intended.
Click "OK" to get out of the window, SAVE your file, and EXIT IFF.
Note: So, how come we used a painting for the
animations and sounds? We didn't have to. Any object with
the ability to invoke the reactions we want would suffice. There is also
Animation Alchemist, and while easy to use, the program isn't suitable for every
hack because the only thing the program accomplishes, is changing
existing animations. We added to what was already present. Often,
we need to go by way of Detroit to accomplish the task at hand, even if that means
using a Hex editor (which would be to your advantage to learn at some point).
Time To Test
Test the chair in your game. Test it to some extent because we are looking
to see if Sims will react the same no matter their personality. You will not get
an enthusiastic "Hooray!" from them, but you should definitely get some
type of approval.
When back from testing, proceed to this week's assignment.
Until next we meet,
Grapholina
WEEK 3: Object Behavior Modification and Adding Motives
ASSIGNMENT
You should now have a good understanding with respect to borrowing sounds and
animations. Your assignment is to locate other, more interesting animations and
sounds in other objects, and place them into your cheap chair. You will be overriding
the ones we just added.
When finished, zip up your chair and upload it to our Class Discussion area
so that I can download it from there.
It is alright to permanently change your chair's animations and sounds. We
will continue to work with the chair next week, but any changes you make now will
not impact next week's lesson.
As a reminder for next week, it is our last for this class, and one of our
assignments will be to create a brand new object using all the skills you've learned
in this class. Although I encourage you to start thinking about it now and perhaps
even begin work on your class object, I suggest that you do not "finish"
your object this week as next week we will be learning something brand new and
extremely useful.