WEEK 2: Enhancing Moods
Author: Grapholina
Last week we began work on the Cheap Dining Chair by tweaking the advertisements
on the object so that what we advertised for the chair became a lie. This week,
we are going to cancel out a few of the big fat lies, thus effectively rendering
our chair quite respectable. Sort of.
EXPLORING THE BEHAVIORS (BHAV) SECTION
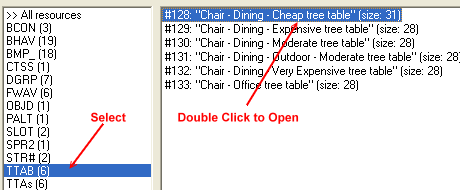
Open your Cheap Chair from last week in IFF, click on the "TTAB"
section to select it, and then double click on the chair's description over to
the right to open up the Tree Table window for the chair.

Fig. 1.0
If you will remember back to last week's lesson, we determined this is the
place to start when hacking any object, because it will show us where
in the BHAV section to look for the action's behavior number.
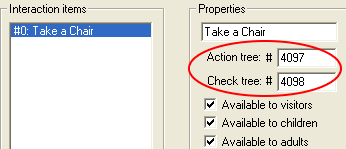
If we look in the Action Tree and Check Tree sections, we will find our starting
point.

Fig. 1.1
In this case, we need to move from here into the BHAV section, and find behaviors
#4097 (action tree) and #4098 (check tree). If you think you'll forget these,
write them down now so that you do not have to keep flipping back and forth between
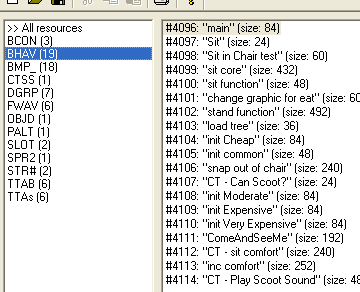
screens. Click "OK" to get back to the main window, locate BHAV, and
click it once to select it. To the right, you will see all the behaviors associated
with our chair (as well as some other chairs we really don't care about).

Fig. 1.2
Find Behavior #4097 "Sit" and double click it to open it up.

Fig. 1.3
Let's read this line to see what it is telling us. The far-most column is the
"Line" column and this is where the lines of code are numbered. They
all start with "0".
The second column "Instruction" is the actual code interpreted for
us into everyday English.
The third column is for the "Next" instructions, also known as True/False
lines or statements.
The Next instructions in this behavior #4097 is quite flimsy since there is
only one line of code in the behavior, but as we move along through our chair,
we will see better examples. Right now, this line says:
I want you to go to my Private Sit Function and follow the instructions
there (sort of like a scavenger hunt). You can do this if my conditions for sitting
have been met (the true statement, and the conditions is the stuff found in the
Check Tree). If those conditions are are not met, then stop and don't do anything
(the False statement).
WEEK 2: Enhancing Moods
EXPLORING THE BEHAVIORS (BHAV) SECTION (continued)
Alright, then. We know the script is telling us to go elsewhere if conditions
are met. So, before we follow any "go to" instructions, we should first
find out what the conditions are, right? Right. Our check tree was Behavior #4098,
so let's go there right now. Click "OK" to get out of this window and
get back to the behaviors section.
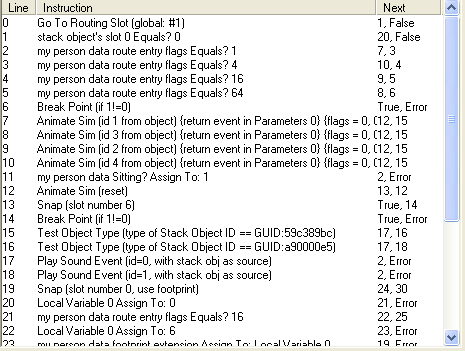
Find Behavior #4098 (the check tree #) and double click it to open it. This
is what it looks like:

Fig. 1.4
A bunch of goobledymuck, don't you agree? And look, even if the lines are numbered
correctly 0 through 3, the "Next" or "True/False" statements
are a mess, hopping from one line to another willy nilly without rhyme or reason.
Which brings us to our next Hacking Rule.
Hacking Rule #3: Optimize or Rewrite. Get in the habit; it'll
make your life easier. When you open a behavior for viewing, all the bits and
bobs will be there, but somewhat out of order (even though they appear to be numbered
correctly. To "reorder" the lines of code so they read correctly and
consecutively, we optimize or rewrite the lines of code. If we are using IFF,
we rewrite. If we are using SS, we optimize. Same outcome, different names. Let's
do that now.
Let us now rewrite the lines of code and compare so that you
can get a good idea of what rewriting or optimization does for you.
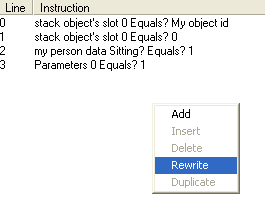
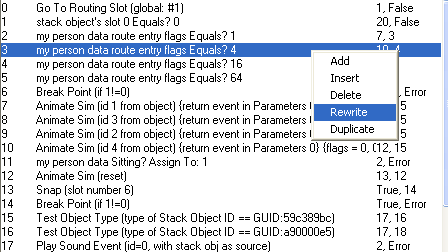
While still inside the Behavior #4098, place your cursor anywhere in the white
space and right click. You will be presented with a menu, and from that menu you
will select "Rewrite".

Fig. 1.5
WEEK 2: Enhancing Moods
EXPLORING THE BEHAVIORS (BHAV) SECTION (continued)
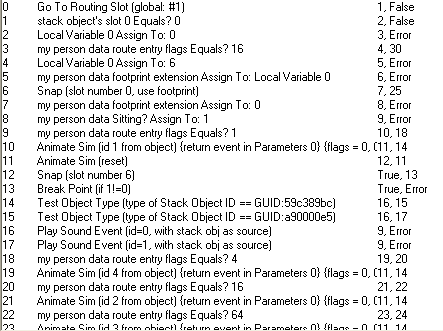
Compare the difference between Fig. 1.4 and Fig. 1.6 below. See the difference?
The code is much easier to read and follow after rewriting the lines of code.

Fig. 1.6
Interpreting the above lines means we would need to go into stack objects and
slots; something we are not yet prepared to do. So, in this lesson we will only
scan through the code, reserving the fine details for learning at a later date.
However, a brief over view of the above reads like this (in a round-about way):
Is the Sim trying to use me, the Cheap Chair? If I am the Cheap Chair the
Sim is trying to use, is there anyone sitting here? If I'm unoccupied let the
Sim sit, and if not, tell him to wait or move away.
On your own, you can study this behavior to see if you can make sense out of
it. However, for the purpose of this lesson we have satisfied our curiosity and
made sure there is no funky conditions to be met here like, is it raining outside?
Or, am I Bella Goth? Or worse... Is this an Expansion Pack 19 chair and do you
have it? That would be totally wrong and quite difficult to circumvent because
I don't know about you, but I don't own Expansion Pack 19.
Anyway, we need to get back to where we were, over in Behavior #4097. Click
OK to get out of this window and go back to the Behaviors window. Find #4097 and
double click it to open it once again. And here we are, staring at this strange
and vague line of code.

Fig. 1.7
We were about to ask the question, "How do we know what that private sit
function does? And where the heck is it?" Um, okay, so that's two questions,
but we can handle it.
WEEK 2: Enhancing Moods
EXPLORING THE BEHAVIORS (BHAV) SECTION (continued)
Quite simple, really. Any time you see [priv:], that means another little behavior
elsewhere outside of the current behavior, which in this case is Behavior #4097,
that is where we are. With that 0 line selected, look over to the right and you'll
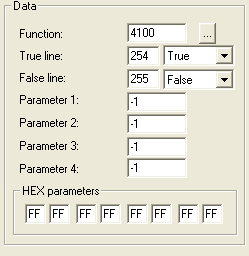
find a very handy dandy section which just happens to be called the Data Box:

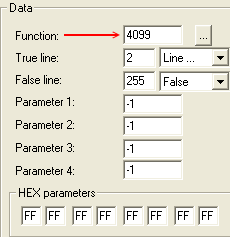
Fig. 1.8
Look at the number to the right of "Function". It says 4100. In other
words, the private call is telling us to go to Behavior #4100 to get the proper
instructions for the Sit function. We'll go there in a minute, but first I want
to go over the entire Data box shown above in Fig. 1.8.
Function 4100 is the script # or behavior # we are being instructed to go to.
Immediately following are the True Line and False Line statements we discussed
earlier (the third column).
Notice that Parameters 1 through 4 are all marked as "-1". This means
a private call. If it wasn't a private call, we'd
have actual numbers in those parameters, delineating the boundaries for our Function.
Also important to note at this point, is the fact that typing in -1 in those boxes
will be nearly impossible since the program doesn't like it. Instead, whenever
you have a private call, you need to move to the HEX parameter
boxes located at the bottom, and manually type in the letter "F"
all the way across. This is native to IFF only. SS handles private calls a bit
differently, as we will see momentarily. Take a moment to write down Behavior
#4100 in your notebook, so you will not forget where we are to go. We're about
to take a short side trip before resuming our scavenger hunt.
SIDE TRIP INTO SCRIPT STATION
We've just learned how to rewrite in IFF, and how a private call looks. It
is only proper that we investigate those two methods in Script Station (SS).
Click OK to get out of the window you are in, SAVE your
file and EXIT out of IFF.
Open Script Station and bring up your Cheap Chair in the program.
We're not going to look at the same behaviors in SS because more than likely
they will already have been optimized (rewritten) by IFF, and instead we'll pick
a different script to optimize.
WEEK 2: Enhancing Moods
SIDE TRIP INTO SCRIPT STATION (continued)
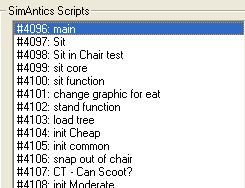
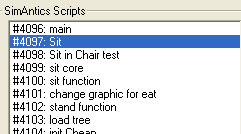
Double click behavior #4096: main to open it.

Fig. 1.9
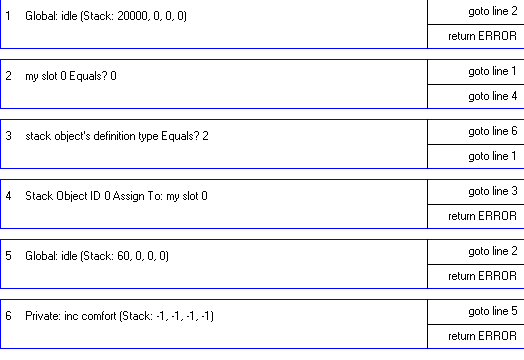
Look at the lines of code here, notice how they are organized, and take a minute
or two to read what each line says.

Fig. 1.10
WEEK 2: Enhancing Moods
SIDE TRIP INTO SCRIPT STATION (continued)
To the right of these lines you will find several buttons. We want to click
the "Optimize" button so that the program rearranges the order of the
code lines into their proper order. Go ahead and click "Optimize".

Fig. 1.11
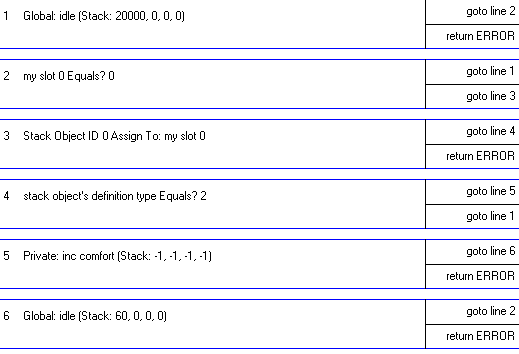
Now that we've optimized the lines of code, take a look at the results, comparing
the before and after shots (Fig. 1.10 vs. Fig. 1.12 below).

Fig. 1.12
Much better, right? Great. Next we are going to take a look at a private call
displayed in SS.
WEEK 2: Enhancing Moods
SIDE TRIP INTO SCRIPT STATION (continued)
Earlier I said we would look at two behaviors different from the ones we worked
with in IFF. I lied; we're going to look at #4097 again. Click OK to get out of
Script Station's Editor window and get back to the main screen.
Double Click #4097 "Sit" to open it up.

Fig. 1.13
This is what our line of code looks like in SS. Let's compare to the view from
IFF.

Fig. 1.14
This is how it looked in IFF — Not much of a difference.

Fig. 1.15
If you'll remember, the way we located the private sit function behavior in
IFF was to select the line of code and then look over to the right at the "Data"
box. SS has the same ability, but if you look to the right, all you are going
to see is our handy dandy buttons. In fact, unless you happened to know how to
access the window, you'd never find it. This is because SS was released by the
creator of the program before the program was completed. He did this due to demand
for the program. Had we allowed the creator to finish the job, we might have gotten
something much better.
Double click line 1 (bound in red).

Fig. 1.16
WEEK 2: Enhancing Moods
SIDE TRIP INTO SCRIPT STATION (continued)
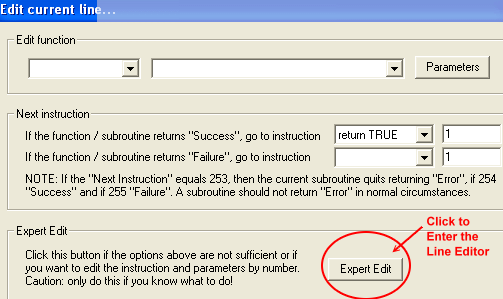
Once you double click the line of code you'll be presented with the "Edit
Current Line" window. There is a button at the bottom of the screen captioned
"Expert Edit". Click that to get where we want to go....

Fig. 1.17
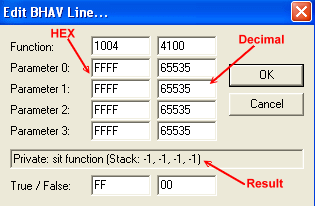
Below is the equivalent of IFF's Data box. Let's go through the
differences, keeping in mind that all the data found in the IFF window is here,
just under a different graphical format, which really doesn't amount to a hill
of beans if you can read the code.

Fig. 1.18
The main difference is that where IFF only had one column of text
boxes where you could enter numbers and then a bunch of boxes at the bottom where
you could enter HEX numbers, SS has two columns and no HEX boxes at the bottom.
This is because the left column is allocated for HEX numbers, and the right column
is allocated for decimals. There are other features, of course, but we'll tackle
those as we get to them. Later.
Note: A wise woman once said: "Never
rely on programs to do the work for you. Learn to read and write, and you'll be
fine regardless of the tools at your disposal." And the same wise woman once
commented: "It doesn't matter which side of the boat you row from, as long
as you get to the shore." Ahem.
WEEK 2: Enhancing Moods
So much for SS discoveries. We need to get back to work on our Cheap Chair,
so click the OK button in your current window, click the OK button in the next
window, and yet again in the third window. You can now click on the big RED
X found on the top right-hand corner of your program window to exit. No,
we didn't change anything, so we didn't need to save our work. The chair will
be just fine.
EXPLORING BEHAVIORS (continued)
That was a fun and enlightening side trip, wasn't it? It is now time to work,
though, so let me refresh your memory. We are in search of the point of entry
for this chair. The point where we can begin modifications. According to the last
note you made in your notebook, we were about to go investigate Behavior #4100
in IFF. Open up IFF, bring in your chair, select the BHAV tab, and then find and
double click #4100 to open it.

Fig. 1.19
Not much to look at here, so we won't even bother with the rewriting
bit. However, look at line 1 — another private call. Do you remember how
to find where that is located? Right.
With the line selected

Fig. 1.20
We look to the right and find our behavior number in the Data
box. This is where we are supposed to go next.

Fig. 1.21
WEEK 2: Enhancing Moods
EXPLORING BEHAVIORS (continued)
Shall we continue our scavenger hunt? Click OK to get out of this
behavior. From the BHAV window, find #4099, and then double click it to open it.
And that behavior looks like this...

Fig. 1.22
Oooh! Oh... Ouch! That is positively awful! Unfortunately we'll
often encounter behaviors like this that are replete with lines of mucky code
which we will be unable to make heads or tails out of without using a very large
magnifying glass. But that's okay. Where there's a will there's got to be a way,
and we usually find it. That's because by nature we're logical creatures, and
when it comes to hacking, logic is our most valued possession.
Let's rewrite this puppy to make it easier to look at, if not easier to read.
We're not very good at reading code at the moment, after all. Right click anywhere
on the white space (if you can find some) to get the menu, and then choose "Rewrite"
from the menu.

Fig. 1.23
WEEK 2: Enhancing Moods
EXPLORING BEHAVIORS (continued)
Your rewritten lines of code should now look like this, and much
easier on the eyes.

Fig. 1.24
For a solid week this chair's code has taken us to many places,
and because we are new at this type of thing, it is possibly easy to forget our
initial objective. Never fear, I shall remind you now!
Our initial objective was to modify this chair's behavior. Remember,
we were not going to change it or add to it. We were simply going to modify the
chair's output, which is comfort. Here's the reminder: We're looking for anything
that talks about comfort. Scan through the lines of code above. Do you see anything
that says "comfort"?
I see a lot of "Animate Sim" lines, and a lot of "my
person data route entry flags". I also see some "Test Object Type"
lines with GUID numbers. But I don't see anything relating to comfort.
Dead end? Not really, because I know exactly where to look!
So why did I put you through the arduous paces when I knew all
along where to go? Because I'm evil, that's why. No, seriously, I did it because
there will be objects to hack where the point of alteration will not be so obvious
— so right under your nose. Also, Maxis sometimes
sticks relative code in the strangest places. The knowledge you (hopefully)
acquired during the preceding exercise will then be of great help to you, when
you come across one of those difficult objects. Trust me. You'll thank me in the
end.
Note: This week we will have an
additional assignment on GUIDs. The "my person data route entry flags"
are nothing more than bits of code the chair has to let the Sims know how and
where to approach the chair so they can sit in it, or leave it. We will not go
into entry flags until a much more advanced class.
WEEK 2: Enhancing Moods
EXPLORING BEHAVIORS (continued)
Alright. Click "OK" to get out of this very nasty and worthless behavior
window, and get back to the main Behavior screen. Let's see what we have here.
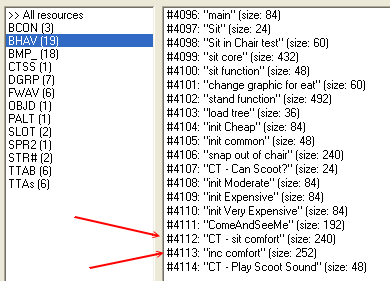
Lookit! There's something about comfort right there! Both of these behaviors will
give us insight as to where we need to modify our comfort levels for the chair.
We'll look at both.

Fig. 1.25
Double click #4112 "CT - sit comfort". Once inside the
behavior, right click to select "Rewrite" from the menu. We should then
see something like this:

Fig. 1.26
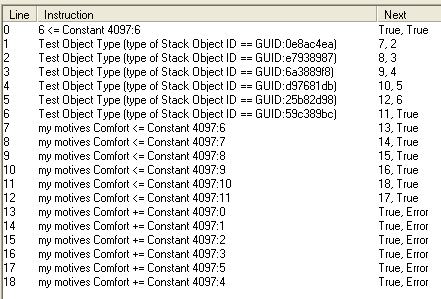
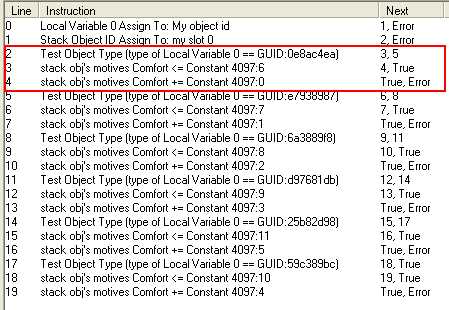
In the behavior we can see some GUID numbers and my motives Comfort
lines that point to "Constants". The reason I said your screen will
look "something" like the above picture is because your GUID
numbers and mine will not be the same, and we'll see exactly why they are not
the same in just a moment.
Notice the True/False statement on the very first line. They do not lead to any of the other lines in this BHAV. All of the other lines here are extra, never being accessed at all. In fact, this first line returns a "True" no matter what so we know this is a dummy BHAV that Maxis added in for their own mysterious purposes.
NOTE: While we aren't going to let ourselves get distracted just now it should be noted that BHAVs starting with "CT-" should be left in the object and not renamed as the "CT" is an indication that Maxis is doing it's own 'mysterious purpose' type things there. We'll save the unraveling of those mysteries for Advanced Level Hacking.
WEEK 2: Enhancing Moods
EXPLORING BEHAVIORS (continued)
Let's open up Behavior #4113 "inc comfort" which really means #4113 "increase comfort". It's very nearly the same as BHAV 4112. The first line in this BHAV does lead to other lines, however so when we rewrite the bhav in a few moments it'll actually make a difference. First, we are going to have a look at the BHAV grouped as it is.
In one section, neatly bunched together, we find some lines that have to do
with GUID numbers (lines 1 through 6).

Fig. 1.27
GUID is an acronym, meaning that you do not pronounce it like a word, but rather
you say the letters as in G - U - I -D. It stands for Global Unique Id. A GUID
is a set of numbers (hexadecimals) that is assigned to each and every object in
the game. No two must be alike or your game will freeze, crash, burn, or reach
over, grab you by the neck and shake you until your brain rattles in your skull.
The Magic Cookie number you've all heard about plays a major part in the GUID
and you will learn about that at the end of this lesson.
Notice there are several GUID numbers here. That's because as you will remember,
Maxis lumped a bunch of dining chairs all together into one tree table. This means
that only ONE of these GUID lines belongs to our chair and the
rest can be ignored. If we could take an eraser and wipe out the "extras",
we would have a nice clean behavior to work with, but alas, that is seldom, if
ever, the case.
In the next portion of our behavior we see a LOT of lines all having to do
with our prime objective: Find Comfort. They all mention comfort. But not all
the lines are identical.
Some say: my motives Comfort < = (lines 7 through
12).

Fig. 1.28
The others say: my motives Comfort + = (lines
13 through 18).

Fig. 1.29
The difference is a matter of math employed, and will make perfect sense if
you understand that one deals with "less than" and the other with "add".
If math stumps you, don't worry, soon enough everything will fall into place with
or without knowing math. I, for one, can't even add 2 + 2 without getting it wrong.
Go figure.
WEEK 2: Enhancing Moods
EXPLORING BEHAVIORS (continued)
Another area we need to cover is Constants. Constants is a
"place" if you will, in the game, where values
are stored. In this particular instance the "container" 4097 is where
the values for the comfort levels are being stored. These values instruct the
chair as to how much comfort to provide. Or how much to impact the room's score.
Constants can be found under the BCON tab if you are using IFF. Another way of
looking at the BCON tab is to regard it as where the "fine tuning" for
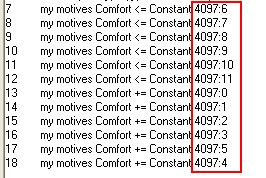
an object takes place. Look at these Constant numbers. All of them Say 4097: followed
by numbers ranging from 0 to 11.

Fig. 1.30
If it will help you remember, you can view Constants like a book.
Chapter (4097:) and page (0 through 11).
Let's go look at the BCON, to see where these are stored. Click "OK"
to get out of your current window, and then find BCON and select it.

Fig. 1.31
To the right of BCON you can see all the Constants available to
the Cheap Chair. The first one, #4096 defines all the types of dining room chairs
in the game. Zero is the cheapest chair, and 3 is the most expensive. Double click
#4096 to open it and see what it looks like.

Fig. 1.32
WEEK 2: Enhancing Moods
EXPLORING BEHAVIORS (continued)
#4097 is the tuning for comfort, and #4098 is the tuning for room
impact. Double click each in turn to see inside of these — we will be working
with both in a little bit. Once you are through exploring the Constants, click
OK to get out of any open window.
FINDING OUR OBJECT'S GUID
Our next job will be to determine which of the GUID's we saw earlier
belongs to our Cheap Chair, and for that we need to dash over to the OBJD
section. If you'll remember, this is where an object's data or information
is stored.
Click the OBJD tab to select it, and then double click line #16808
for the cheap chair. Once inside, scroll a little ways down until you see "GUID
info".

Fig. 1.33
In that section you will find the Global Unique ID for your object (GUID), the
Original GUID of the object (which we will explore later), and the Original suit
GUID (which we do not need to worry about. At all).
Pictured above in the Global Unique ID line is MY chair's
GUID number. My Cheap Chair's GUID number is 0E8AC4EA. Yours will of course, be
different. With that bit of knowledge obtained, we can now identify the lines
of code in Behavior #4113 that pertain to our chair, and in doing so, we know
which Constants we need to modify in order to make our Cheap Chair quit being
such a big fat liar.
Write down your Global Unique ID number, and then let's go back to Behavior
#4113 so we can read those lines of code.
WEEK 2: Enhancing Moods
EXPLORING BEHAVIORS (continued)
Close out of your current window and double click #4113 in the BHAV section.
My chair's GUID number is in Line 1. Yours will be too, although it will be showing
a different GUID number. Your GUID number. Check it against what you wrote down
a minute ago to make absolutely sure.

Fig. 1.34
Line 1 says: Test Object Type [type of Stack Object ID ==
GUID: 0E8AC4EA and right after, it has this: 7, 2 which means, "If
this is your chair, go to Line 7 and follow directions. If it is NOT your chair,
then go to line 2 and test to see if that's your chair. Those lines are commonly
referred to as the "True/False lines".
Since this IS my chair, I'm going to jump down to line 7 to see what that line
is about.
Line 7 says: my motives
Comfort <= Constant 4097: 6 and right after it we have: 13,
True. Translated, this line is telling us:
If the Sim's comfort level is less than
or equal to the amount of comfort the chair can give, than go ahead and
increment the Sim's comfort level at ticks per hour equal to what we have stored
in here (4097:6), then go to line 13 and follow directions there. If it IS NOT...
if the Sim's comfort level is equal to or higher than what is shown in Constant
4097:6, then don't do anything at all (return TRUE).
Line 13 says: my motives
Comfort += Constant 4097:0 and then it says: True,
Error. We interpret this line to mean: Increase the Sim's comfort level
UP TO the amount shown in Constant 4097:0. Do it.
And if you can't, then don't do anything at all (True, Error).
That's all there is to Behavior #4113. We have successfully identified
which Constants we need to alter to make our chair more comfortable and more pleasing.
But as we noted earlier, these lines could all be grouped differently. Rewrite BHAV #4113 now and we'll take another look at it.
WEEK 2: Enhancing Moods
EXPLORING BEHAVIORS (continued)
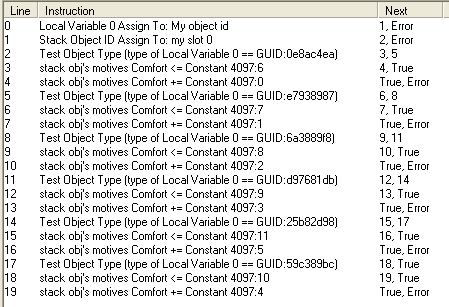
Ah! Oh so much easier to understand.

Fig. 1.35
Locate your chair's GUID number. It should be in Line 2, just like mine. We're
going to read these lines again, just to make sure you understand what is going
on.

Fig. 1.36
Line 2: Is this your chair? If it is, continue to Line
3. If it isn't, jump to Line 5 to see if that is your chair.
Line 3: This chair will provide comfort up to the number
found here (4097:6). Go to Line 4 or do nothing at all.
Line 4: The comfort level will increase at the rate
of X amount of ticks per hour. And the amount of ticks can be found in 4097:0.
Period, end of subect (True/Error).
WEEK 2: Enhancing Moods
EXPLORING BEHAVIORS (continued)
Let's write down the Constants so we do not forget them. In your notebook,
write down:
4097:6 Amount of comfort
4097:0 Ticks per hour (rate of speed to increase)
We have thoroughly checked our behaviors, and we found that the Constants given
to us are IT. As far as comfort goes, there is nothing else, in any other place,
that we can modify. And so, we can now close out of this window and head over
to the BCON area where we will finally turn our cheap and lying
chair into some semblance of respectability.
IMPROVING THE CHEAP CHAIR'S COMFORT
Click on BCON and then double click #4097: "Tuning - Comfort" to
open it.

Fig. 1.37
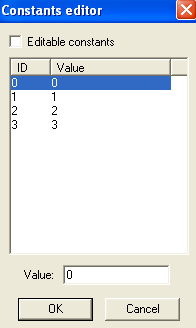
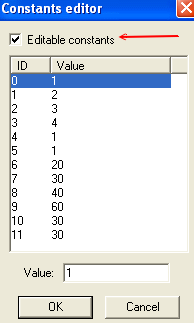
Your Constants Editor window will display like so:

Fig. 1.38
WEEK 2: Enhancing Moods
IMPROVING THE CHEAP CHAIR'S COMFORT (continued)
Make sure there is a check mark beside "Editable constants".
If there isn't one, check it. Look at ID 0 and ID 6 (from 4097:0 and 4097:6).
This chair will only allow your comfort level to climb to 20, and if that isn't
bad enough, it is only going to rise at the rate of ONE tick per hour. Darn cheap
chair! Let's fix it, shall we?
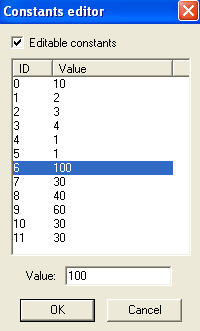
Select ID 6 and in the Value box, change that 20 to a 100. Then,
select ID 0 and change the 1 in the Value box to a faster 10. Does your Editor
window look like this?

Fig. 1.39
Click "OK" when done. Since we're already in the BCON
area, we might as well change the Room Impact of the chair.
IMPROVING THE ROOM IMPACT
We are still inside the BCON area. Double click #4098: "Tuning - Room
Impact" to open it, and let's have a look.

Fig. 1.40
WEEK 2: Enhancing Moods
IMPROVING THE ROOM IMPACT
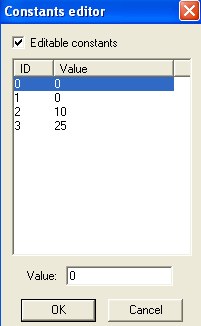
The Editor window should look like this:

Fig. 1.41
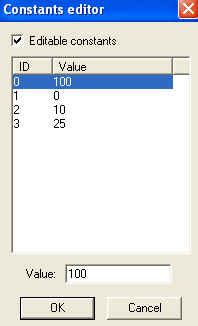
How do we know which ID is our Cheap Chair? As I explained early
on, Maxis rates their chairs from 0 to 3, with zero being the cheapest chair.
Since our chair IS the cheapest there is, then our line to modify will be ID 0.
As you can see, it has ZERO room impact score. Because it's cheap. The most expensive
chair has a room impact score of 25, so in the catalog it'll display as Room +2.
Our chair is going to be a lot better than that, by golly. Let's
be totally crazy and type in a ridiculous number. Select ID 0 (the first line),
and then down at the bottom in the Value box, enter the number 100.

Fig. 1.42
WEEK 2: Enhancing Moods
IMPROVING THE ROOM IMPACT (continued)
I believe we have greatly improved our Cheap Chair, and now, it
isn't such a liar. There's more work to be done on the chair, but we are going
to stop here for now, because I want you to let this soak in. I cannot stress
enough how important it is that you understand what we covered in this lesson.
Constants play an important part in hacking, and knowing which ones to modify
and where to alter is crucial. If you can honestly say that you understand this
lesson, you'll have an easier time in the higher levels of your studies. We are
indeed paving the way for grander works.
Click "OK" when done, SAVE your file, and exit out IFF.
It is time for testing and for our weekly assignment.
Note: Not all objects impact room
score. Some objects do not even contain the necessary behaviors and coding to
impact the room score. However, the fact that an object has no room impact functions
does not deter us as hackers. We have the ability to program room impact into any
object we choose. Including the actual Sims! Wouldn't it be nice if when your
special Sim walked into a room, any room, the room score suddenly went up? Or
even better — if everyone in the room got happy when your Sim entered!
But we will not cover this in the Entry Level classes, since that
is a topic best covered in future, more advanced classes.
TESTING AND TESTING CONDITIONS
Make sure you know the rules for saving and testing. Keep a good copy of your
object in case what you have currently done to the chair does not work.
1. We are checking for Comfort levels, and how fast they increase when a Sim
sits in the chair.
2. We are checking for a higher room score, and because of this, we must make
certain that our testing environment is conducive
to what we are checking for. You cannot put this chair into a room packed with
expensive furniture that have already increased your room score. Likewise, you
cannot put the chair into trashy surroundings, because if that's the case, any
piece of furniture you put in the room will increase the score.
Instead, place the chair into an ordinary room. One good place would be a bathroom
where scores are usually medium to low because tubs and appliances like the ones
found in a bathroom generally do not increase room score.
Your Sim will probably still think the chair is "just okay",
he's not going to be terribly excited about it. At least not until next week.
Visitors and your Sims will seek out this chair to sit in because of the advertisement.
In general Sims seek out objects that provide for their needs in this order:
1. Fun
2. Hunger
3. Comfort
Keep that in mind while hacking objects. Other than affecting
their mood, Sims really don't care much about room scores. But WE do.
Next week, we will be working with a bit of animation, sounds,
delving into a couple of globals, and ADDING motives and behaviors to our chair.
Right now you may proceed to the assignment.
Until next week,
Graph
WEEK 2: Enhancing Moods
Assignment
1. After testing your chair, go back into the BCON for comfort
tuning and room impact and mess around with those figures, to get an idea of the
possibilities, until you settle on something that you like. However, when you
are done messing around, put the values back the way we now have them, so we can
continue with our chair next week. Keep in mind that a "good hack" is
a realistic hack. Beginners usually like maxing things out, and while fun to do,
it isn't realistic. There has to be a trade off. Some kind of cause and effect.
Post your findings in our Class Discussion area. I am interested to know what
you tried and the outcome.
2. Please complete this the
GUID Exercise, and when done, post in the Class Discussion area as
to whether or not you understand GUID's. It is important that you understand them
because as we progress through our lessons, GUID's will strongly come into play.
I need to make sure you know all about them. If you do NOT understand them after
completing the exercise or still have questions (about GUID's or anything else),
PM me or email me and I will help you one-on-one.
Next week, we will be working with a bit of animation, sounds,
delving into a couple of globals, and ADDING motives and behaviors to our chair.
Until then...
Graph
