WEEK 1: Moods, Motives and Advertisements
Author: Grapholina
WELCOME
Hello, everyone and welcome to class. Before we start, I'd like to take a few
minutes to give you a brief outline of what to expect over the next 4 weeks. We
will be covering a great amount of information that on the surface may appear
useless, and probably not a lot of fun. Nevertheless, the information is necessary
so as to give you a solid hacking foundation from which to build on. As you go
through the different class levels (Entry, Intermediate, Advanced), you will no
doubt recognize why we covered what is contained here.
The most important thing you should keep in mind is that you are here to learn,
and therefore you should take your time with the lessons. Go over them until you
are sure you understand what we are covering, and if at any point you are the
teensiest bit unsure — about anything — you should stop right there
and contact me so that I can explain things. It is better to catch possible future
problems early on.
First, There are game players. Typically people who play the
game for the sake of playing and generally do not like getting involved in either
object creation or object hacking. And,
A BIT APART FROM THE COMMUNITY AS A WHOLE
There are object makers. These folks are involved in the “creative”
factor of the game. The people you find in this category are creative. They recolor
or alter Maxis created objects to provide the Community with “new looking”
objects for the game. In rare instances, an actual object maker will pop up. These
folks have the skills and tools to create, through a 3D program, a new-looking
object. The reason I say “new-looking” is because no matter how unique
an object looks, the fact still remains that the new-looking object still sits
atop a Maxis base object, so while the object looks new, it is indeed still the
same old sofa or the same old TV.
And still further apart and smaller in numbers, there are object behavior
modifiers (hackers). This is where we fit in. People involved in this
sector of the game are logical creatures; creative, but in a different way. Hackers
will modify the code of a Maxis base object to enhance the object’s functionality,
or alter it to the extent that it is no longer recognizable (i.e., SimSlice’s
Rejuvenator). Once again, keep in mind that hackers seldom, if ever, create “new
objects” (since that would require creating completely new code for new
behaviors). All hackers merely borrow Maxis’ base code and alter it to suit
their needs.
To continue, rarely will you come across a person who is all three: Player,
Object Maker, and Hacker. Some try, but don’t come across well, and the
reason is the processes involved (left brain/right brain governed skills). Hence,
if one of these creatures pops up in the Community, he/she is indeed a rare individual.
Aside: It irks me beyond belief when I hear
a person say, "That is mine, I created it, and it is copyrighted. You cannot
duplicate it!" Excuse me? All you did was change the behaviors around a bit,
and although the idea for the fountain that oozes out gold coins may be altogether
yours, ideas are not copyrightable. If you would like to copyright an object,
you may do so, providing that Maxis releases its rights to the base and its proprietary
code. The copyright fee is $20 - $40 per item. If I were to go to all that bother,
I would be issued a certificate bearing a copyright number for my object. Whereupon,
I would proudly display it with the object and issue the order that the object
may not be duplicated. Bottom line: if it pleases you, and you are skills-wise
able to create an object — Do so. Too many of us are unjustifiably intimidated
by the arrogance without basis of the more well known.
WEEK 1: Moods, Motives and Advertisements
Instructor: Grapholina
OBJECTS
Everything in the game is an object, and every object has its own set of local
data and behaviors, which in turn allow for multi-tasking within the game. (I.e.,
Betty can be dancing to a tune on the radio while Bob is busy watering the flowers,
and the phone can be ringing in the background accompanied by the noise coming
from the TV.) The object’s local data defines the parameters (boundaries)
of the object and provides pointers within those parameters to other objects it
is related.
Betty Newbie and Bob Newbie are indeed objects, and as hackers, we cannot forget
this. Betty and Bob possess the ability to interact (talk, fight, kiss). Those
interactions are also objects. Each object has behaviors
and each behavior has a test behavior (a checkpoint)
in one way or another, but usually in the form of "Check Trees". We
will delve deeper into the checkpoints later on, but for now, suffice it to say
that without behavior checkpoints, it is possible to block some actions or clog
up sub-routines. These tests or checkpoints determine whether or not the action
that is to take place can or cannot happen.
Example: Betty Newbie and Bella Goth are on Vacation Island.
They may cross paths many times over and you may wish for them to talk to each
other (interact). However, Betty cannot simply walk up to Bella and strike up
a conversation, especially if Betty and Bella have not previously met. The game
looks at the social/talking behavior in this manner:
Look at Betty: Has she greeted Bella? (Checkpoint)
If so, walk up to her and strike up a conversation. If not, greet Bella (possible
outcomes - behaviors).
Consider this Condition: Does Betty like Bella? (checkpoint)
If the answer to that checkpoint is yes, then Betty has the ability to strike
up a conversation with Bella. If it is no, then Betty will not seek to talk to
Bella.
Further checks might be: Does Bella like Betty? (checkpoint)
Is Betty agreeable to Bella’s topic of conversation?
(checkpoint)
Depending on the answers to the checkpoints, the game will fragment into the
different available paths (behaviors). Bella could be tired and not want to discuss
anything with Betty. Bella could hate Betty and will not want to talk to her about
anything. The above is an example of how a number of intermediate objects work
together to implement behaviors.
WEEK 1: Moods, Motives and Advertisements
When Betty and Bella strike up a conversation, an invisible Social Interaction
object is created, and when Betty and Bella stop talking, the
Social Interaction object that was dynamically created is at that time, destroyed
by the game.
Each Sim and each object contains a tree with all possible behaviors (interactions)
allowed to the Sim or object (i.e., slap, talk, tease, flirt, etc.). When Betty
decides to talk to Bella, Betty is calling up the social interaction behaviors
in Bella’s tree (more on trees later), and so an invisible object is created
(social interaction).
Whether the execution of this invisible object plays out depends on different
things. Is Bella busy at the moment? Is Bella tired, hungry, or depressed? If
Bella is none of the above, the social interaction will execute and Bella and
Betty will have a decent conversation. If not, the interaction will simply drop
out of cue, or Bella will respond with the sad face bubble, or dramatically tell
you she’s too tired or too depressed to talk to Betty.
All of the above deal with moods and motives; two major components of the game.
Without them, the game wouldn’t be as fun.
AVAILABLE MOODS AND MOTIVES
There aren’t a lot of moods available to the Sims; nevertheless, we can
do quite a bit with those at our disposal. We merely need to learn the code numbers
assigned to these moods. They are as follows, please write them down in your notebook:
3 = Mood
5 = Energy
6 = Comfort
7 = Hunger
8 = Hygiene
9 = Bladder
11 = Sleep State
13 = Room
14 = Social
15 = Fun
Note: We have the ability to alter moods, motives,
and personality (discussed in future lessons). Indeed, there is very little of
the game we cannot modify as we see fit. This also applies to the actual Sims,
and we will learn to do so in the more advanced classes.
LOCATING MOODS IN OBJECTS
For the most part, it doesn't take a rocket scientist to determine what moods
are involved with which object. A shower, for instance, deals with the hygiene
mood (8). A chair deals with comfort (6), and a bed (slightly more complex) deals
with energy (5), comfort (6), hygiene (8), bladder (9) and hunger (7) all at once.
What you do need to know is from where these functions are called
within the object so that you can alter them at will. Some objects display their
moods easily enough; other objects force you to dig and follow strings of code
all over the place (sometimes across several objects) before you arrive at the
actual altering point.
WEEK 1: Moods, Motives and Advertisements
EXPLORING THE CHEAP DINING ROOM CHAIR (continued)
To show my point, we will explore a dining room chair. We’ll use the
cheap chair for our explorations because this is the one that could use a bit
of help when it comes to comfort, not to mention appeal. It is, an ugly cheap
chair.

Fig. 1.0
As good hackers, we should do everything within our power to improve our Sims’
comfort, regardless of their financial status. We’re going to look at this
object through two of the available tools.
Hacking Rule #1: Before we hack an object, any object, we
should clone it.
Note: We clone using the program "Transmogrifier",
or Tmog for short. If you are not familiar with Tmog and how it works, please
go through Lady Kay's tutorial found in the forum,
before continuing this lesson.
We never hack an original game object, but instead hack a clone
of the object in question. Sometimes an object can be located right away using
Tmog (as is the case with our Cheap Dining Chair, and other times we need to use
a program such as Far Out (there are several of these programs) to extract a copy
of the original object from one of Maxis’ FAR files, and from the extracted
copy, we make a clone of the object and use it to hack.
Note: A far file is nothing more than
a “zipped” up file that has the extension ".far", and contains
hundreds of Maxis objects. The current version of Tmog has been updated so that
we now can see all Expansion Pack objects through Tmog. Before this version, we
could not see objects beyond the first couple of expansion packs.
Open Tmog, find “diningchairs” and clone the “Chair –
Dining – Cheap” one. Name it anything you like; I'm going to name
mine "classchair". You should also go into the “Edit Object”
area and give it an appropriate definition so that you do not confuse it later
on with one of your keeper objects.

Fig. 1.1
WEEK 1: Moods, Motives and Advertisements
EXPLORING THE CHEAP DINING ROOM CHAIR (continued)
Close Tmog when you’re done, and then open up IFF Pencil 2 (IFF).
Locate your your cloned copy of the cheap dining chair, and open it in IFF.
By default, all cloned objects will be placed by Tmog into your Transmogrified
folder, which can be found in C:\Program Files\Maxis\The Sims\Downloads.
Take a look at the IFF window once you open your chair in there. It looks like
this:
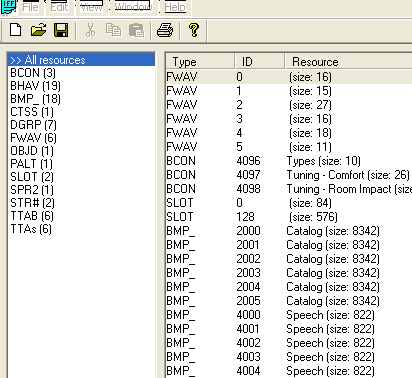
Fig. 1.2
Everything you see here makes up our wonderfully cheap chair, soon to be an
extraordinarily wonderful chair. Let’s dig into this chair to see what makes
it tick, and what, if anything, the chair provides our Sims. As to what all the
abbreviations on the left mean, we will get to them soon enough in a future lesson,
and worrying about them now will be useless.
WEEK 1: Moods, Motives and Advertisements
EXPLORING THE CHEAP DINING ROOM CHAIR (continued)
After cloning an object for hacking, the first thing we want to do is go into
the Tree Table for the object. We want to do this because until we become very
comfortable with hacking, the Tree Table will always give us a starting point
when we're searching for the place to modify our code. Look in the left-hand side
panel of your IFF window. Maxis gave the Tree Table the abbreviation "TTAB".
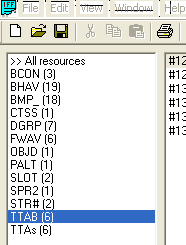
Fig. 1.3
Click "TTAB" to select it, and then look over in the right-hand side
panel. You'll see several different chair descriptions there. This is because
Maxis loves to group like objects into one tree. So, in the case of a dining chair,
no matter which type of dining chair you open up, you're going to find all the
ones listed here.
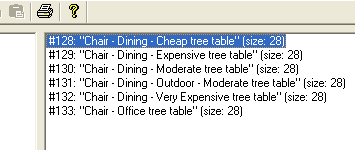
Fig. 1.4
Which tree you go into depends on the type of chair you are working with. In
our case, we are working with the Cheap Dining Chair, which is depicted here in
#128. Double click #128 to open up the tree for our chair. We need to look and
see what is in there. The left hand portion of your window should now look like
this:
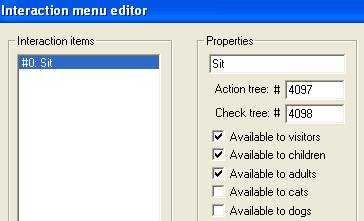
Fig. 1.5
Let's examine the window, and learn to "read" it properly.
WEEK 1: Moods, Motives and Advertisements
EXPLORING THE CHEAP DINING ROOM CHAIR (continued)
You'll notice the window titled "Interaction Items".
The contents of this window tells you the "actions" or "interactions"
available to the object. Notice that our chair has only one option available:
Sit. In an upcoming lesson we will learn how to add more interactions to an object.
Under the "Properties" box you see the name of our
action "Sit", and our Action and Check Trees. The Action Tree
shows that the behavior for the Sit function lies in behavior #4097. This means
that if we look at behavior #4097 (found under the BHAV tab), it will tell us
how the chair instructs the Sim to find the chair and enter into it (sit down),
or how to leave the chair.
Beneath the Action Tree is the Check Tree. Remember our checkpoints
discussed earlier? The function of a Check Tree is nothing more than a snipet
of code that indicates whether or not the interaction in question can be executed,
often depending on the state of the object. This Check Tree #4098 is the checkpoint
for our chair. If we look in Behavior #4098, it will tell us the conditions that
must be met before a Sim can use the chair. If we didn't have this Check Tree,
Sims would try to use the chair whether it was occupied at the time or not, possibly
resulting in Sims sitting on top of other Sims. Not good.
Directly beneath the Tree numbers are check boxes for who
or what can use the chair. Currently, the first three boxes are ticked, meaning
that visitors, children and adults can use the chair. They do not, of course,
need to be ticked. If you didn't want visitors using the chair, simply uncheck
the "Available to visitors" box. If you wanted cats to sit in the chair,
simply tick the "Available to Cats" box. Of course, there are no animations
for cats sitting in chairs, so your object would be a bit on the quirky side.
(That's not to say that we can't accomplish it. But that's a story for another
lesson, because working with animations can be tricky.)
In case you are wondering, "Allow Consecutive" means that the interaction
can be queued up. In the case of our chair, you really don't want to use this
feature. "Sitting" consecutively would not be too cool.
Now, look over to the far right of your window. This window is the Advertisement
window and it tells the game how to advertise the the object to the Sims. This
is what attracts the Sim to an object. This calls to the Sims. Essentially,
these are "motive incentives" for the Sim to use the object. Bear in
mind, however, that this advertisement does not affect how the
object will work in the game. Our Cheap Dining Chair says that the comfort level
the chair provides is 0 to 25 (about a 2), and it is accurate because the catalog
(the little thumbnail picture and description of the chair you see when you enter
Buy mode) displays the chair with a comfort level of 2.
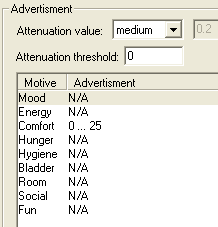
Fig. 1.6
WEEK 1: Moods, Motives and Advertisements
EXPLORING THE CHEAP DINING ROOM CHAIR (continued)
As chairs go, the comfort level is low, but then, what else can we expect from
a cheap chair, right? With this type of advertisement, Sims are not likely to run to the chair for comfort. Instead, they will seek out other objects that are advertised as providing higher levels of comfort. And since the chair has absolutely
no Room score advertising, they are very likely to go "Yuck!" when they
first see the chair placed in their homes.
Also found under Advertisement is the "Attenuation value". This little area confuses many people, but it is really quite simple in terms of function.
If you were to pull down the menu for the Attenuation value window, you would
see that you can set the values anywhere from none to high, and there's even a
"custom" value where you can enter your own numbers. Our chair has a
"medium" attenuation value. "What does that mean?" you ask.
Attenuation declares how quickly an advertisement will fade. If you set it
to none, the advertisement will call to the Sim regardless of distance from the
object.
Note: Whether a Sim likes or dislikes an object
also has to do with their mood at the time of viewing and with their individual
personality. Grumpy and Mean Marvin will probably hate everything placed in front
of him. But fudging with the room impact scores can sometimes help, if only just
a little bit. Fiddling with these numbers, we can possibly turn a strong "Yuck!"
into a passable "shrug".
Let's try a little experiment. We are going to advertise this
chair as having a Room score of 0 to 100, and a Hunger score of 0 to 100. We will
also change the attenuation from medium to none. This will be a big fat lie, of
course, but the Sims won't know that.
Go to the Attenuation value box, and select "none" from the menu.
Move down to the motives section, click on "Room" to select it, and
in the boxes below, enter the number "100" into the "max"
box like so:
WEEK 1: Moods, Motives and Advertisements
EXPLORING THE CHEAP DINING ROOM CHAIR (continued)
Click on "Hunger" to select it, and in the boxes beneath, enter "100"
into the "max" box:

Fig. 1.8
Finally, move over to the left-hand side of the window, and select the line
"#0 Sit" under "Interaction Items". In the adjoining text
box, where it says "Sit", change that to "Take a Chair". Does
your screen match mine?
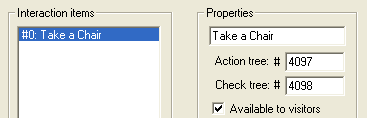
Fig. 1.9
Click the "OK" button to close the window and to get back to the
main IFF screen window.
Now that we have successfully lied to the Sims, we are going to lie to the
people who play the Sims. Quite evil of us, don't you think?
Locate the OBJD section and click on it to select it. This is were the object's
important data is stored (object information).
WEEK 1: Moods, Motives and Advertisements
EXPLORING THE CHEAP DINING ROOM CHAIR (continued)
To the right of that you will find the object description.
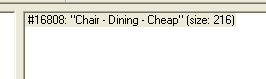
Fig. 1.11
In this case, we only have one to choose from, but in some objects you may
find up to 10 descriptions. For the most part, you can decide which one to open
up if you go by the object description, and when that turns confusing, there are
other ways, which we will go into much later on.
Double click #16808: "Chair - Dining - Cheap" to open it. The window
that comes up will look something like this:
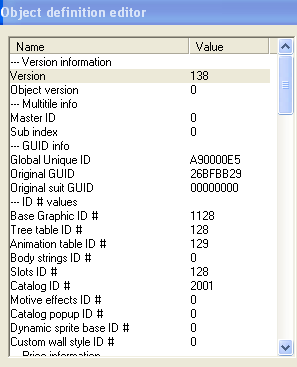
Fig. 1.12
WEEK 1: Moods, Motives and Advertisements
EXPLORING THE CHEAP DINING ROOM CHAIR (continued)
Take a few minutes to scroll up and down, taking note of all the information
contained herein. There's quite a bit that is useful! Scroll down and you'll see
the chair's price information. The picture shows us that the Chair retails for
80 Simoleons and that there is no "sale price" per se. It tells us that
the initial depreciation after you buy the chair is $12, and thereafter the chair
depreciates at the rate of $1 per day. However, as showing in the Depreciation
limit, the chair cannot depreciate more than $32.
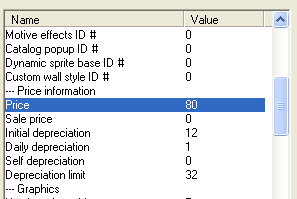
Fig. 1.13
Scroll further down and you see the Ratings, which just happens to be what
we are messing around with at the moment. Look at the Rating: comfort line. A
measly little 2. Unacceptable! Especially since we're lying to players. We want
them to buy our dear little chair, after all, and a 2 won't entice them to buy
it for their precious Sims.
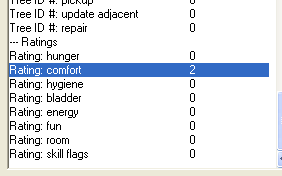
Fig. 1.14
OK now, look over to the right of that Ratings area, and you will find the
Edit Window. Here is where we change our numbers which are shown to the left.
All we need to do is highlight the area we want to change (on the left), and then
enter the appropriate numbers to the right in the Edit Window. More often than
not, you will be changing numbers in the "Decimal number:" box. Unless
you're comfortable with Hexadecimals (Hex).
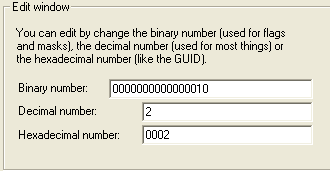
Fig. 1.15
WEEK 1: Moods, Motives and Advertisements
EXPLORING THE CHEAP DINING ROOM CHAIR (continued)
So, to continue with our lie... you should still have Rating: comfort 2 selected.
Place your cursor inside the Decimal number box and change that ugly 2 to a more
acceptable well-rounded 10. Once you do this, the catalog description will show
that this chair's comfort level is a 10, as opposed to Maxis' chair that rates
comfort as a paltry 2. Ha!

Fig. 1.16
I know it is quite tempting, but refrain from changing anything else for now.
This will do nicely for our lesson. Click the "OK" button to get back
to the main screen, and then SAVE your file and EXIT
the IFF program.
Recapping: So far, we have not modified any of the actual
code for the chair. We have, however, big time lied to both Sims and players about
what this chair will do for them. We've changed what appears in the menu for the
chair when you click on it from "Sit" to "Take a Chair". We
also modified how the Sims will regard the chair, and when you go into Buy mode,
the chair will have an advertising of 10 for Comfort.
A View From Script Station
We will now look at our Cheap Chair from Script Station (or SS for short).
This program is as close as we can get to using Edith (the program Maxis uses
to program and debug the game). Once you get to know your way around hacking,
and the code used for The Sims, the program you use really doesn't matter. SS
is, compared to IFF, outdated. Just like Tmog used to be outdated. However, despite
the many downsides, it is still a powerful tool.
WEEK 1: Moods, Motives and Advertisements
A View From Script Station (continued)
People who are not comfortable coding, using a Hex editor, or simply don't
have a lot of time to spare will always prefer IFF over SS. Why? Because the new
IFF 2 utilizes a small script that translates most of
the code for them into plain every day English. SS can only interpret for you
the first few Expansion Packs. Once you've been introduced to all the tools and
are hacking on your own, which tool you use is entirely up to you.
Launch SS, locate your Cheap Chair, and open it in the program. As you can
see, this program's window looks quite different from the IFF window, but indeed,
all the bits and pieces that make up our chair are there; just under different
section names. Take a look at the ensuing image. Each section will be explained
below.
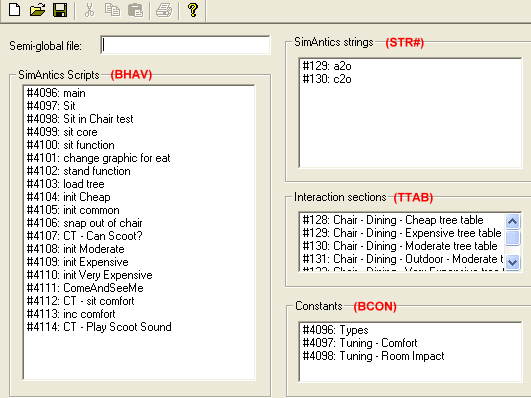
Fig. 1.17
SimAntics Scripts: These are all the behaviors
for our Cheap Chair, and if you'll look closely, Maxis was also kind enough to
provide the behaviors for the other more expensive chairs (albeit: unnecessarily).
In IFF, these behaviors will be found under BHAV,
noted in red above.
WEEK 1: Moods, Motives and Advertisements
A View From Script Station
SimAntics Strings: Typically what you will find
here are animation strings for interactions such as Adult to Object (A2O), Child
to Object (C20), Adult to Adult (A2A), etc. If this chair possessed skins (like
a dress, accessory, or head), those would also be found in this area. In IFF,
these bits would be found under STR#.
Interaction sections: The information found here
is that of the Tree Tables. In IFF they are located under TTAB,
and are the very ones we modified in our Cheap Chair.
Constants: This is the area where we fine tune
our moods. In IFF they are located under BCON. If
you'll remember, by changing things up in the Interaction sections, the tree table
(under TTAB for IFF) for our chair, we actually lied to our Sims. This ole cheap
chair most definitely will not give them much comfort, assuage their hunger, or
improve the room score. However, in upcoming lessons, we will get rid
of the lies and make the chair do what it is advertising.
Locate #128: Chair - Dining - Cheap tree table inside the "Interaction
sections" and double click it to open it up. Doesn't look any different than
what you saw using IFF, does it?
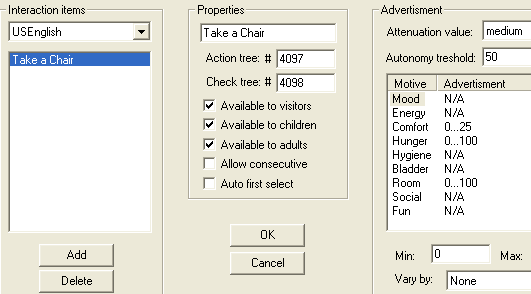
Fig. 1.18
The only thing you may run into trouble with on this
screen, is entering the MAX numbers for hunger, or hygiene, or whatever you may
happen to be altering. Not always, but sometimes, you'll enter a number in there,
save, exit, and come to find out, darned old SS didn't retain the values you entered!
If that happens, all you need to do is take it over to IFF and enter them from
there. So, why not just do it with IFF from the start? Because believe it or not,
some things are much easier to accomplish using SS. And I'm not talking
about long, drawn out projects, folks. I'm talking about simple ones; unless as
I said before, you know your way comfortably around code and can work in SS from
beginning to end.
Close SS. You don't need to save or anything because we did not
alter the file from this program. All we did was look at it. HOWEVER:
The biggest fault with SS is the saving your file part. You CANNOT
save your file and continue working. Once you save, you MUST
exit the program. Completely. If you do not, SS will continue working for you,
but that bit you thought you saved… will have gone Poof!
WEEK 1: Moods, Motives and Advertisements
The Rules: If Hacking Rule #1 is "Clone your object
first", then Hacking Rule #2 is: TEST, TEST, TEST.
By this, I mean you should stop your work after each significant
section, and test the object in your game to see how you are progressing. Let
me give you a small guideline to follow while hacking. It will save you many headaches
and keep you from going gray early on.
1. Clone your object.
2. Hack your object in sections.
3. When you get to your first stopping point, stop and test the object in the
game.
4. If it worked up to your stopping point, make a COPY (not a clone) of your object
file, and keep it in a separate folder for safekeeping. My safekeeping folder
is called "Holding Tank".
5. Continue hacking your object until the next stopping point, then stop and test
again.
6. If it works, great! Continue from #5 above.
7. If it did NOT work, then trash that file and dig out your saved GOOD copy and
resume hacking from there.
8. Unless you have extraordinary memory capacity, it is wise to keep a notebook
and pen nearby to jot down the steps you took, what you did while hacking. Believe
me, a week down the road, you'll forget just exactly what was done and more importantly,
why you did it. Especially if you are working with more than one object
at a time (not recommended).
Time To Test
Close out of any programs you may have open, and fire up your
game. Make sure your testing conditions are right. Pick a family, possibly one
that can call up a friend or two to see the visitors' reaction, and you do not
want to surround the cheap chair with extremely posh furnishings. You want to
check for the following:
- How did the Sims react when you first placed the chair in the house.
- Did the Sims want to use the chair? (Remember they are looking for hunger
so a Sim who is full will not necessarily want to sit in our lovely Cheap Chair.
A visitor, on the other hand, will almost always go directly to the chair because
that is what visitors do when first arriving — they seek out food.
- There will not be an impact on the Room score, so no worries there.
- When you clicked on the chair, did the correct action name show up?
- How about the catalog advertising for comfort?
WEEK 1: Moods, Motives and Advertisements
More on IFF
I realize that this, your first lesson is heavily laden with information, and
you're probably tired of the whole thing, but learning this right now is terribly
important. I cannot stress enough how vital to your hacking success this is. On
a brighter note, however, you should know that you need not memorize any of this
or be particularly concerned with it at the moment. In due time we will cover
everything through lessons and then the information will click into place for
you.
Have your notebook ready, we're about to briefly touch upon each section of
IFF and you'll want to take notes. We won't go into great detail because we'll
be doing that with each of the ensuing lessons.
BCON: This area contains Constants and the values stored
in the Constants. An example would be the Room Impact score assigned to an object.
GLOBAL: Not every object you open in IFF will display
a Global section. It is used by objects that require the use of Semi-Global files
which reside in \GameData\Globals\Globals.far.
BHAV: The Behaviors section of the object is the most
important one you will work with. This is where all the programming takes place
and without the behaviors, the objects would be static and useless because there
could be no interactions.
BMP_: This section contains thumbnail graphics for the
object. The thumbnails are the ones you see in the game. The section usually contains
"Catalog" pictures which are the ones shown in the game's catalog. The
other ones mentioned here are "Speech" pictures. The latter are the
little pictures of objects you see in thought bubbles when Sims are viewing, talking
about, or dreaming about the object.
CTSS: This area is where you find the text description(s)
associated with objects (define the in game description of objects. The information
contained in CTSS is the equivalency of what you see in Tmog when you click the
"Edit Definition" button.
DGRP: Stands for "Draw Group". In the Precursor
part of this lesson, I gave you a screen shot of the Draw Group section in Tmog.
Using IFF, we are able to modify object draw groups by either adding to the group
or taking away from the group. We will have a detailed lesson on this topic in
the Intermediate class.
FWAV: This is where names of sound files the object
uses are referenced. Please note, only the sound names are found here and NOT
the actual sounds. This is something everyone misunderstands.
OBJD: The OBJD section contains all the pertinent information
on the object in question. In this section you find things such as object price,
daily depreciation, the GUID, and much much more. It is such an extensive field
that in a later lesson, we will cover each item contained herein in greater detail.
WEEK 1: Moods, Motives and Advertisements
More on IFF
OBJf: This section is not found in all objects. When
you do see it, it will contain mostly resource information for the object —
usually in conjunction with or in addition to what is found in the OBJD section.
PALT: The content of this section is associated with
the draw groups and cannot be modified in IFF unless you use the Hex Editor that
comes with the program. Tmog manipulates PALT automatically, but it isn't something
you can tell Tmog to do.
SLOT: There really isn't much we can do with this section;
at least not while using IFF. If you click on anything contained in this area,
you will get the IFF Hex Editor. I can, however, tell you that SLOT deals with
how objects can be intersected or approached. This is a section that you will
not see in each and every object.
SPR2: Another section linked closely with the Draw Groups
and BMP's. Again, you cannot modify this section of the object unless it is with
the Hex Editor. SPR2 stands for Sprites.
STR#: The strings section contains dialog text messages
and references to animation files. Most of the animations referenced here are
actually located in Far files elsewhere in the game. Occasionally, however, an
animation will be embedded in the object itself.
TTAB: The acronym for Tree Table and what links behaviors
to interactions. This area houses the menus you see when you click on an object
in game. It also contains object advertisements, who can interact with the object,
and attenuations.
TTAs: This section contains nothing more than the name
of interactions as shown in the TTAB section of the object (view, brush teeth,
etc.). For most people who are using IFF in a language other than English, this
section becomes quite important because for them (such as in the Dutch language),
the TTAB section does not do a complete job and they therefore need to work in
the TTAs part of IFF to get the finished results.
Now that your head is properly inundated with this information, I'm happy and
we can stop the torture. As I mentioned earlier, each of the sections will be
discussed in-depth later as we progress through our lessons and classes. So, don't
worry if you didn't quite understand something or if you currently think there
is no possible way you'll learn all of this. I assure you that every bit of the
above will become second nature in due time.
We can now proceed to our Assignment for the week, and don't forget to keep
your Cheap Chair; we will continue to use it.
Until next week....
Grapholina
WEEK 1: Moods, Motives and Advertisements
ASSIGNMENT
- I need to know your results from when you tested the cheap chair in the game,
so please post your findings and results in our classroom's discussion area (our
forum).
- We will be using our Cheap Chair for a while, so what I would also like you
to do this week, in preparation for next week's lesson, is to go into the BHAV
section of the chair, using IFF, and take the time to read each behavior that
pertains to the Cheap Chair. Make notes of anything that looks to you
as if might be useful or important. Learning to "read" code is part
of hacking, and the more you attempt to read and interpret what the lines say,
the better and faster you'll understand what you are doing.